When it comes to trading strategies like Grid and Martingale, one of the key aspects you need to get right is your lot sizing and the number of trades. It’s crucial for maximizing your success and minimizing your risk.
As traders, we often look back at a symbol’s historical performance, especially during range zones. A question we frequently ponder is: How Many Times did the price bounce between the two limits of a range zone?
This concept is what I call the Bounce Number. It can be calculated through statistical analysis of any symbol’s historical data from the market.
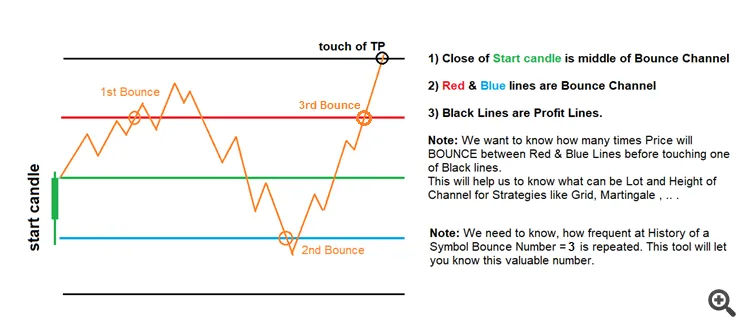
To clarify this further, let’s take a look at Image No. 1.

Image No. 1: Definition of Bounce Number, its goal, and applications
The image illustrates how price movement generates statistics for the Bounce Number Tool. To manage delays, I developed it as an Expert Advisor (EA) that employs a Sleep function. This function helps prevent crashes on your chart, especially when dealing with a high number of candles set in the tool's input.
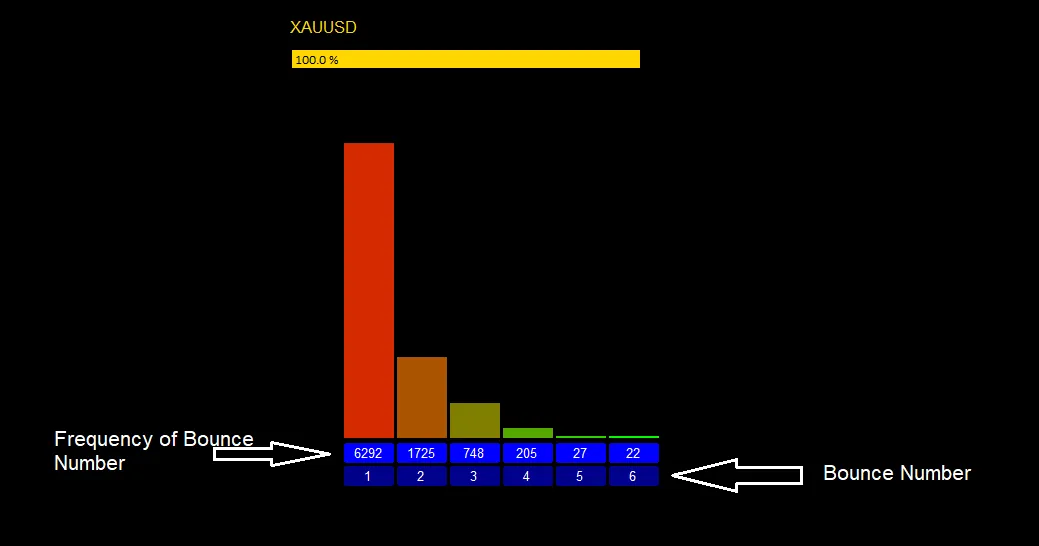
Now, let’s take a look at Image No. 2, which presents a brief graphical representation of the tool and what the different objects mean.

Image No. 2: Bounce Number Statistics.
Using the Tool:
Referring to Image No. 2, let’s say we set the Bouncing Channel Half Height to 600 points:
- We can identify 6 different bounce numbers ranging from 1 to 6 for this symbol.
- A bounce number of 2 indicates that the price starts from the middle of the bounce channel (height of 2 * 600 = 1200 points), moving up and down, touching the red line once and the blue line once before reaching the Take Profit (TP) of 1200 points. For bounce number 5, the price starts from the mid-point of the channel and touches the red line 2 times and the blue line 3 times, or vice versa, before hitting the TP of 1200 points. This logic applies to all bounce numbers.
- There is no bounce number 7, which means the price hasn’t bounced between the red and blue lines 7 times (with a distance of 1200 points) over the entire historical data selected in the tool’s input. Keep in mind that the more historical data you use (the Max number of lookback candles), the greater the chance of identifying 7 bounces. However, even for 6 bounces, the chance is only 22 out of 9020 total price hits at TPs.
Input Settings for the Tool:
- - Max number of lookback candles: Like with any scanning tool, be cautious about how many you set here. Avoid increasing it too dramatically to prevent crashes due to memory overload.
- - Time-Frame: The time frame of the candles you want to analyze for bounces from channel limits and TP line touches. A lower time frame is preferable for narrow channels. If you’re unsure, it’s best to stick with the M1 time frame.
- - Bouncing Channel Half Height: This is the distance in points between the green line and the red and blue lines.
- - Chart Background Color: Set this to your preference.
- - Bar Chart Color 1/Bar Chart Color 2: Use these to add a bit of flair to your statistical bars.
- - Count Cells Color: Choose a color for the count cells.
- - Bounce Numbers Cell Color: Pick a color for the bounce numbers cell.
- - Load Bar Color: This load bar will indicate whether the tool is working and how quickly calculations are progressing.
Additionally, a button has been added to start the calculations and to enter the number of historical candles directly from the screen.

Comments 0